How to Start a Native Plant Garden From Scratch
- Give A Shit About Nature
- April 13, 2026
- Backyard Habitat, Native Plants
- 0 Comments
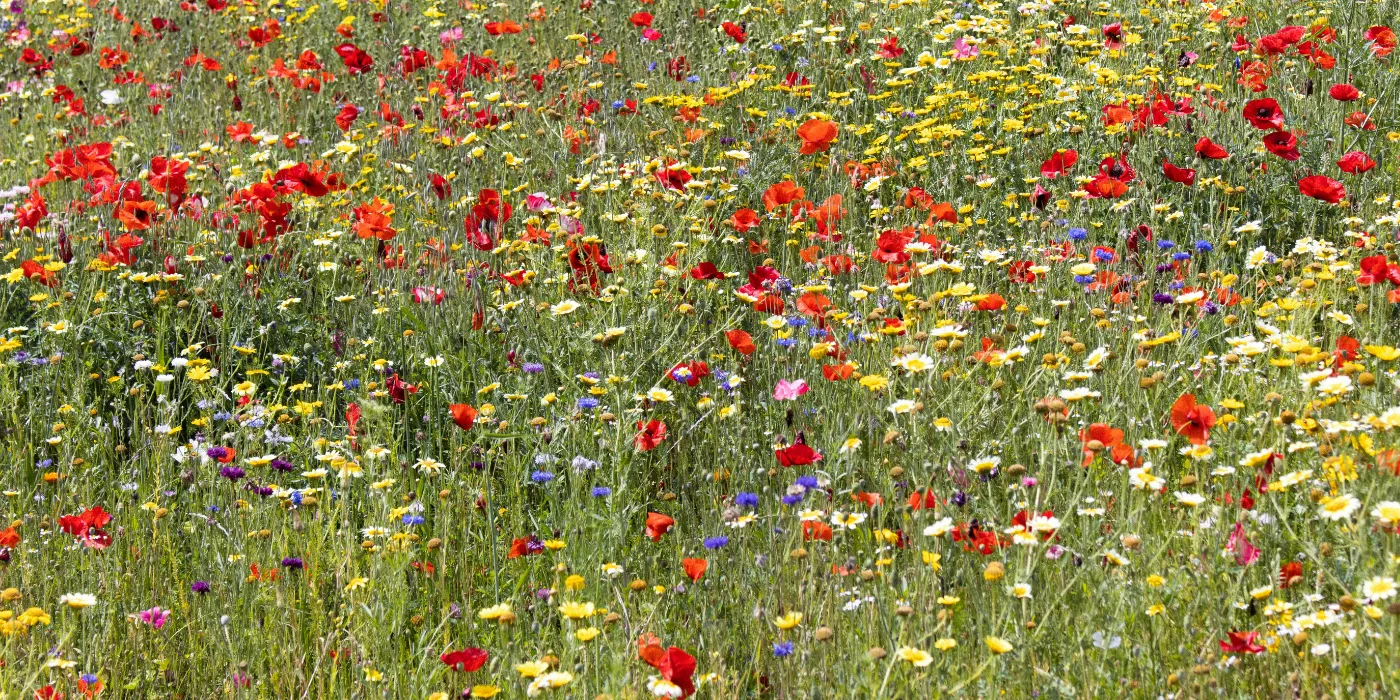
Starting a native plant garden is one of the most genuinely useful things you can do for the wildlife where you live. Native plants support the insects, birds, and other animals that evolved alongside them in ways that ornamental plants from other parts of the world simply cannot replicate. A garden full of beautiful imported plants can look lush and feel alive, but ecologically it’s closer to a green desert than a habitat.
The good news is that starting from scratch is much more approachable than most people assume. You don’t need a large space, a large budget, or years of gardening experience. You need to understand a few principles, figure out what’s native to your specific area, and work with your soil and light rather than against them.
This guide walks you through every step, from the first observation to the first season of maintenance.
Step one: observe before you do anything
The single most common mistake beginners make is buying plants before understanding the space. Spend at least a few weeks, ideally a full season, observing your site before you dig or plant anything.
What you’re looking for:
Sunlight. How many hours of direct sun does the area get? Track this honestly. Many people overestimate how sunny a spot is. Full sun means six or more hours of direct sunlight daily. Part shade means two to four hours. Full shade means less than two. Most flowering native plants need at least four to six hours, while woodland natives are often specifically adapted to low light.
Moisture. Does the area drain quickly after rain, stay consistently moist, or collect standing water? Dry, rocky, or sandy soil; rich, moist loam; and boggy wet ground all support completely different native plant communities. The plants that will thrive in your garden are determined largely by this factor.
Existing vegetation. What’s already growing there? Note any invasive plants, since removing them before planting is much easier than removing them after. Invasive species vary by region — what’s invasive in one place may be native somewhere else — so local knowledge matters here.
How you use the space. Where do people walk? Where do you sit? Where do children or pets play? A native garden that works with your life rather than against it will be more likely to actually happen and less likely to be ripped out in frustration two years later.
Step two: find out what’s native to your specific area
This is where most guides fall short for a global audience, so it’s worth spending time on.
“Native” doesn’t mean native to your country or continent. It means native to your specific region, the ecological community of plants, insects, fungi, and animals that co-evolved over thousands of years in your particular place. A plant native to one part of a country may provide almost no ecological benefit in another part of the same country.
The best approach is to find a resource specific to your region. Here’s how to do that depending on where you are:
In the United States: The NWF Native Plant Finder lets you enter your zip code and see which plants support the most wildlife species near you, based on Doug Tallamy’s research. The Audubon Native Plants Database is another strong resource. Searching your state name plus “native plant society” will usually find a local organization with region-specific lists and often plant sales.
In Canada: Provincial native plant societies and the Canadian Wildlife Federation offer regional guidance. Provincial conservation authorities often maintain native plant lists as well.
In the UK and Europe: Plantlife and the Royal Horticultural Society’s guidance on wildlife gardening are strong starting points. Local wildlife trusts maintain regional lists, and searching your county or region plus “wildflower gardening” often surfaces excellent local resources.
In Australia and New Zealand: State-based greening organizations, local councils, and organizations like Greening Australia maintain regional native plant resources. Indigenous plant species vary dramatically by state and territory.
Globally: iNaturalist is a community science platform that can help you identify what’s already growing natively in your area. Simply looking at what grows in undisturbed natural areas near you — roadsides, forest edges, meadows — gives you an invaluable picture of what’s adapted to your local conditions.
Your local botanic garden or cooperative extension service (in countries that have them) is often the most direct resource of all. Botanists and master gardeners with genuine local knowledge can save you months of research.
Step three: choose your site and size
Start smaller than you think you should. A well-established five square meter garden beats a sprawling, struggling one every time. You can always expand.
You don’t need to replace your entire yard at once. In fact, starting with one bed, one border, or even one container is a perfectly legitimate approach. The goal is establishing something that works, learning from it, and building from there.
Choose a location based on what you observed in step one. If you want flowering plants that support pollinators, you need a reasonably sunny spot. If you’re working with deep shade, focus on woodland natives adapted to forest floor conditions.
When deciding on the shape and size of your bed, mark it out with a garden hose before committing. Walk around it. Look at it from the house. Make sure the size feels manageable, not heroic. A native garden that you actually maintain will do far more good than a larger one that gets abandoned.
Step four: remove existing vegetation
This step is physical and takes time, but doing it properly makes everything easier afterward.
Most beginner native gardens are converting existing lawn, which means removing turf grass before planting. There are two main approaches:
Sheet mulching (lasagne method). This is the gentler, no-dig approach. Mow the area short, then cover it completely with overlapping layers of flattened cardboard, making sure there are no gaps. Wet the cardboard thoroughly. Then cover with a thick layer of wood chip mulch, leaves, or compost, at least ten centimetres (four inches). Leave it for one season. The vegetation underneath will die and decompose, and by the following planting season you’ll have soft, workable ground to plant into.
This method works reliably for most lawn grasses but less well for extremely vigorous stoloniferous grasses (those that spread by runners above ground), like bermudagrass, kikuyu, or couch grass. These may push through the cardboard. In those cases, physical removal is more reliable.
Physical removal. Use a spade or sod cutter to lift and remove the turf layer. This is more labor-intensive but immediately effective. For large areas, renting a sod cutter saves significant effort. Remove as much of the root system as possible to prevent regrowth.
Avoid tilling. Tilling turns the soil and brings dormant weed seeds to the surface, where they germinate enthusiastically. It also disrupts the soil food web that your future plants will depend on. Native plants don’t need tilling. They need the existing soil structure left mostly intact.
Step five: understand your soil (and resist the urge to improve it)
Here is something counterintuitive that trips up many beginners: most native plants don’t want rich, amended soil. They evolved in the specific soil conditions of your region, which may be lean, rocky, sandy, or heavy clay. Adding bags of compost and fertilizer can actually make things worse, causing plants to grow too quickly, flop over, and become more vulnerable to pests.
Before buying any amendments, do a basic assessment of your soil:
Texture test. Take a handful of moist soil and squeeze it. If it holds its shape and feels greasy, you have clay-heavy soil. If it crumbles immediately, you have sandy or lean soil. Loam falls in between.
Drainage test. Dig a hole about 30 centimetres (one foot) deep, fill it with water, and watch how long it takes to drain. If it drains within an hour, drainage is good. If it sits for many hours, you have a drainage problem that some plants will love (wet-tolerant natives) and others will not.
Soil test. If you want numbers, a basic soil test through your local extension service or a garden center will tell you pH and nutrient levels. This is most useful if you’re trying to grow plants with specific preferences, like blueberries, which need acid soil.
In most cases, match plants to your existing soil rather than amending the soil to suit plants. This is the core of sustainable native gardening. The right plant in the right place needs almost no intervention.
Step six: select your plants
With your site assessed and your soil understood, you’re ready to choose plants. Use the resources from step two to build a list of natives that are appropriate for your region, then filter by the conditions of your specific site: sun exposure and moisture level primarily.
A few principles that apply everywhere:
Layer your planting. Natural plant communities grow in layers: tall trees, understory trees and large shrubs, mid-layer shrubs, herbaceous perennials, ground covers, and bulbs. Even a small garden benefits from thinking in layers. Vertical structure creates more habitat niches and a more resilient planting overall.
Prioritize keystone species. If you haven’t yet read our guide to keystone plants, start there. A small number of plant species do most of the ecological work in any given region, supporting disproportionate numbers of insects, birds, and other wildlife. Identifying and including even one or two keystone species in your garden dramatically increases its impact.
Plan for bloom succession. Aim for something in flower from early spring through late autumn. Early bloomers feed emerging pollinators before much else is available. Late bloomers, like asters and goldenrod, are critical fuel for migrating butterflies and bees preparing for winter. A garden that flowers for just six weeks in summer is far less valuable than one with a long season.
Consider plant size at maturity, not at purchase. A native plant that looks modest in a small pot at the nursery may spread to two or three metres across within a few years. Space plants based on their mature size, not their current size. This feels odd at first, because newly planted beds look sparse. Resist the urge to fill every gap immediately — those gaps will close.
Start with plugs or small plants, not seeds. Direct seeding is a wonderful approach for large areas and for gardeners with patience, but for beginners establishing a new bed, starting with small plants gives you faster results and clearer identification. You know what you planted, which makes weeding much more straightforward.
Step seven: plant at the right time
Timing varies by climate, but the general principle is to plant when your weather is mild and reliable moisture is available, so plants can establish roots without stress.
In temperate climates with distinct seasons, autumn is often the ideal time for most native perennials, shrubs, and trees. Cooler temperatures reduce heat stress, and plants can establish roots through winter without putting energy into top growth. Spring planting also works well once the risk of hard frost has passed.
Avoid planting in summer heat in climates where summer is hot and dry. Newly planted natives, despite their eventual drought tolerance, are vulnerable until their root systems establish, which typically takes one to two full growing seasons.
Step eight: plant properly
The actual planting process is straightforward. Dig a hole roughly twice as wide as the root ball and approximately the same depth. Remove the plant from its container and loosen any circling roots gently. Place the plant so the top of the root ball sits at or slightly above the surrounding soil level. Backfill with the soil you removed, firm it gently, and water deeply.
Avoid planting too deep, a common mistake that rots the crown and kills plants. If in doubt, plant slightly higher than you think, not lower.
After planting, water thoroughly. Then add a thin layer of mulch around the plant, keeping it several centimetres away from the stem to prevent rot and pest problems. Two to four centimetres of mulch is enough for most perennials. More is needed for shrubs and trees.
Step nine: water through establishment
This is the step most people underestimate, and it’s where many native plant gardens fail.
“Native plants are drought-tolerant” is true, but only once established. During their first growing season, and often into their second, newly planted natives need consistent moisture to develop the root systems that will eventually let them thrive without intervention. An underwatered first-year native plant will often survive but may not establish well, leaving it vulnerable in subsequent seasons.
Water deeply and less frequently rather than shallowly and often. Deep watering encourages roots to grow downward, where moisture is more stable. Shallow, frequent watering keeps roots near the surface, where they’re vulnerable to drought.
Once your plants are established, which you’ll recognize by strong new growth and the plant clearly settling in, you can begin reducing irrigation and letting rainfall do most of the work. Most native plants need no supplemental watering at all after two to three years in appropriate conditions.
Step ten: maintain lightly and let the garden develop
A native garden in its first year looks sparse and can feel discouraging. This is normal. Most native perennials put their energy into root development in their first year and don’t look impressive above ground. The second year brings significantly more top growth. The third year, the garden begins to look like what you imagined.
The main maintenance tasks in the first few years are weeding, since you need to keep non-native plants from competing with your establishing natives, and occasional watering during dry periods. Beyond those two things, the goal is largely to get out of the way.
Resist cutting everything back in autumn. Seed heads feed birds through winter. Hollow stems house native bees. Leaf litter shelters caterpillars and other overwintering insects. Leaving your garden standing through winter isn’t laziness; it’s what wildlife needs. Cut back in early spring, before new growth emerges.
Don’t be alarmed if plants look eaten. Native plants support native insects, and native insects eat leaves. This is the whole point. A plant with some leaf damage is a plant doing its job. It will recover. A garden with no leaf damage is a garden where nothing is living.
Avoid pesticides entirely. This bears repeating because it matters enormously. Pesticides do not distinguish between the pest you’re targeting and the caterpillar that will become the butterfly you’re hoping to attract. If you’re building habitat, chemicals are not compatible with that goal. The pest-predator balance in a healthy native garden typically resolves itself over time as populations of beneficial insects establish. For more on this, our guide on why rewilding your yard works goes deeper on the ecological principles involved.
Starting small: the container option
If you don’t have garden space, or if you’re not ready to convert a full bed, container planting with native species is a completely legitimate starting point. A single pot of goldenrod or native asters on a balcony supports specialist bees that may find nothing else for city blocks around. A container of native milkweed can be part of a monarch butterfly’s migration route.
The constraints are real: containers dry out quickly and require more watering, root systems are limited, and many keystone trees and shrubs need ground planting to reach their potential. But containers get you started, build your knowledge, and contribute more than you might expect, particularly in dense urban environments where any native planting is a significant addition.
Frequently asked questions
How much does it cost to start a native plant garden? It varies enormously. A single native perennial from a local plant sale might cost the same as a coffee. Sheet mulching with cardboard and wood chips is nearly free if you can source the cardboard from a recycling area and the chips from a local arborist or tree service. Buying larger, more established plants from nurseries costs more but gives faster results. Most people start with a modest budget and expand over time.
How long before I see wildlife using my native garden? Faster than you might expect. Butterflies and bees often find native flowers within days of planting. Birds are attracted by seed heads within the first season. The fuller wildlife response, including nesting birds, specialist bees, and diverse moth and butterfly populations, builds over two to four years as the plants establish and the word gets out, so to speak, to the local insect community.
What if I have an HOA or local regulations restricting what I can plant? This is a real challenge in some areas. Practical approaches include installing a clear border around your native planting to signal intentionality, choosing native plants with a tidier appearance rather than purely wild-looking species, and educating neighbors proactively about what you’re doing and why. In many places, HOA regulations are becoming more wildlife-friendly as awareness of native planting grows. Some jurisdictions now have right-to-garden or right-to-wild laws protecting native plantings. Your local native plant society will often know the regulatory landscape in your area.
Should I remove all non-native plants from my garden? Not necessarily, and certainly not all at once. A gradual transition is more practical and less disruptive to whatever wildlife is already using your existing plants. Focus on removing invasive non-natives, which actively harm local ecosystems, and replacing ornamental non-natives over time as they naturally decline or need replacing. Don’t let the perfect be the enemy of the good.
I killed my first attempts. What went wrong? The most common causes are insufficient watering during establishment, planting in conditions that don’t match the plant’s needs (too much shade, wrong soil moisture), and buying plants labeled “native” that aren’t native to your specific region. Check the plant’s specific requirements against your site conditions, make sure you’re watering deeply through the first growing season, and source plants from reputable local nurseries rather than big-box retailers where provenance is often unclear. Every gardener kills plants. The goal is to learn from each one.